Welcome to the world of DASM! For students who want to learn!

LINKS

Saving your location and direction.


Button Text

FACEBOOK

GOOGLE

Saving your location using Kismet.

In this part of the tutorial we are going to save where we were last standing and the direction we were looking.  Also we are going to have an elevator waiting for us on two separate levels. First to run this map you will need this file: DOWNLOAD: The lift  

This file is an elevator used in the map. If you do not download this file the map will not function correctly. Place this file in your maps folder along with the other files added earlier in the tutorial.

STEP ONE

Load or start UDK if it is not loaded already.

Click "File" then  "Open"

Click on the "Savepositiondemo.udk file.

Click "Open".


STEP TWO

This map contains a few different ways of saving certain events and checkpoints.

There are four keys you can press also. Each key does a specific command.

The O key will delete any files saved with this map.

The I key will teleport you back to the start if you are in trouble or stuck.

The P key will exit you from the map.

The Q key will save your exact location.

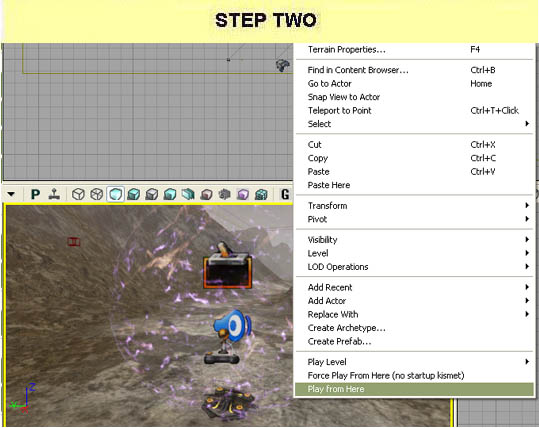
Click "Play from here" or "Play"-"On PC"

STEP THREE

This map has a series of triggers and an event where you need to trigger a lift so you can run across the top of it to exit the map. If you do not trigger the lift you cannot leave.

If you trigger the lift it will save it's location. So for an example, run into the lift, run out, then save your position. When you restart the map the lift will be where you left it.

When you have finished playing around, open up Kismet. There is a sequence there called Save_Your_Position. If you cannot see it, click the eye in the menu as indicated left. This will zoom you to where the sequence is.

Double click the Sequence to open it. If you look around there are Kismet Widgets and some text explaining what each Widget does. Spend some time here modifying and reading what these Widgets do.

The good news is we can copy and paste these Widgets into our own projects.

Hold CTRL and press C to copy and press CTRL and press V to paste.

*Note* This will only copy Kismet over and not the triggers or meshes. They have to be copied over separately. But with some practice you will get used to it.

STEP FOUR

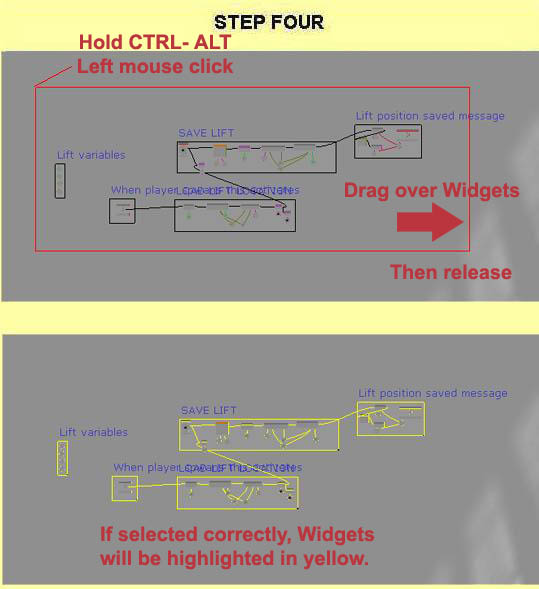
To be able to copy and paste these Widgets we need to select them first. First locate the Widgets you wish to copy.

Find a corner from the Widgets and hold left "CTRL" and left "ALT" keys and left click the mouse button.

While holding all these buttons down, drag the red box over the Widgets you want to copy.

When you release the buttons and the mouse button it will highlight the Widgets with yellow.

Hold down "CTRL" and press "C" on the keyboard and release.

If you hold down "CTRL" and press "V" it will paste the Widgets.

If you exit and load another map and open Kismet, if you hold "CTRL" and press "V" it will copy the Widgets to this new map you opened also.

This is how you can transfer the Widgets so you don't have to sit there and build them again manually.

Hold CTRL and press C to copy and press V to paste.

This also works with meshes and objects. throughout the editor.

STEP FIVE

The biggest problem with Copying and Pasting Widget commands sometimes is when there is a conflict between triggers and meshes etc.

So make sure after copying Widget commands that the item actually matches the item attached to the Widget.

UDK can automatically assign triggers and objects but when you copy and paste Kismet commands on a big map full of triggers and items it can get confused.

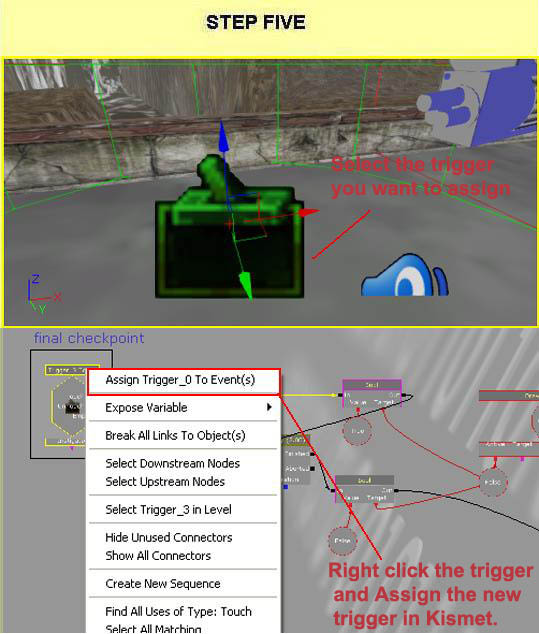
For example in the image left, we want the trigger Trigger_0 to run a Kismet command but Trigger_4 is assigned to it instead.

First we need to click the trigger we want. (Trigger_0)

Then we open Kismet, right click where Trigger_4 is located in Kismet and select "Assign Trigger_0 To Event(s)".

This will change it from Trigger_4 to Trigger_0.

You can also do this to Static meshes, movers, etc.

I hope this tutorial has helped you. I wish you the best of luck in your project. There is one more tutorial if you wish to do it but it is not necessary.

<Click here for the last step>

Have Fun!

[Top]

______________________________________________________________________

  All software packages created was used by the power of the Unreal Development Kit.

  In game loading screens created by using BINK VIDEO.

______________________________________________________________________

Comments on this site to: feedback@worldofdasm.com

Date Modified: 04/01/2016

© World of DASM, and the DASM series, created by Shane Hillier

.

© 2013-2016 all rights reserved