Welcome to the world of DASM! For students who want to learn!

LINKS

Using FSCommands in Flash.


Button Text

FACEBOOK

GOOGLE

UDK and Flash FSCommands.

For UDK to understand Flash we need to have some form of communication. So we use FSCommands to do this within Kismet using FSCommand widgets. If a button is clicked UDK listens for these FSCommands and reacts depending on what the commands are. We will also need to add some script in the Flash Action window for this to work. Before we can go any further, download the file below to continue.

DOWNLOAD:: Imboredmenu.udk

STEP ONE

This was tested on UDK-2013-07 & UDK-2012-05 and used Adobe CS5.5

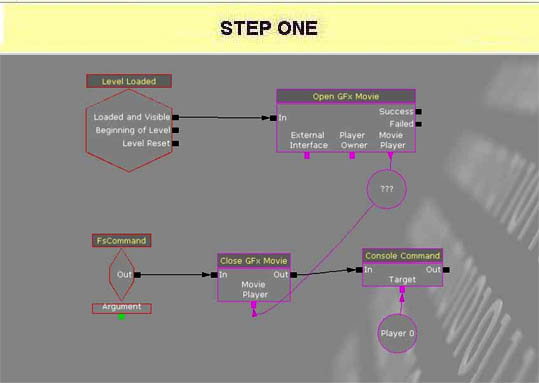
In this tutorial we are going to use FSCommands for our menu.

The file Imboredmenu.udk has the Widgets set up already so if you like just go to STEP 2, install the file, open it and have most of the work done for you especially if you did the previous tutorial.

If your curious how the widgets are set up please continue this tutorial. I will guide you through the set up step by step so don't worry too much.

STEP TWO

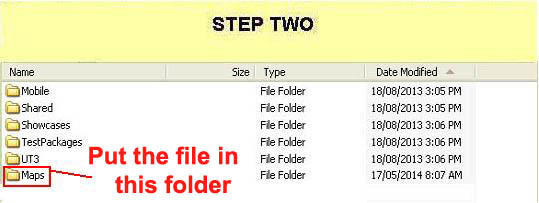
Locate the directory:

C:\UDK\UDK-2013-07\UDKGame\Content\Maps

(Example only above)

Put the file called "Imboredmenu.upk" in the folder named "Maps"

STEP THREE

Now we  need to IMPORT the Flash file you created in the previous tutorial or prepare your own now. The problem is if you Import

  • Start UDK

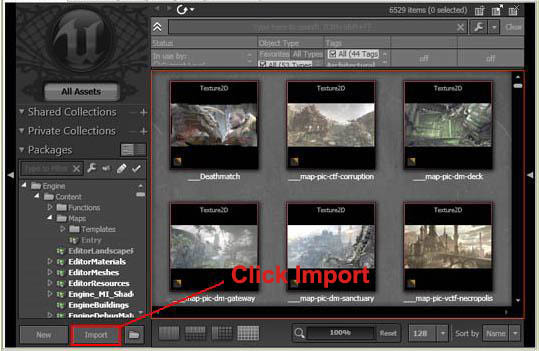
  • Open the UDK Content Browser

  • Click the Import Button

  • Locate the UDK Flash directory where you saved your Flash file

  • Select the menu file you want and click "Open"

  • When the Import window opens click "OK to All"

  • Go to File and Save All in the UDK editor menu

  • Open Kismet

Green arrows adds movies from the Content Browser. The Magnifying Glass is a shortcut to the Content Browser if it is closed.

Click green arrow to add movie and add the FSCommand sequence underneath it.

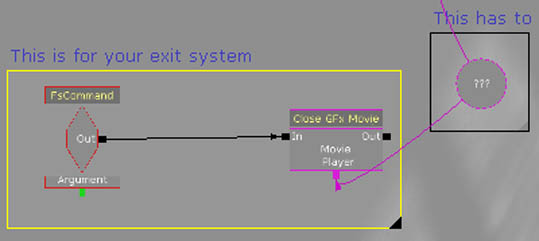
Connect the FsCommand widget to the close GFxMovie widget

STEP FOUR

We need to add these two widgets left:
  • Right click in the Kismet window and select "New Event" and select "Level Loaded"
  • Right click in the Kismet window and select "New Action" and select "Open GFxmovie"
  • Connect the Level Loaded widget to the Open GFx Movie widget
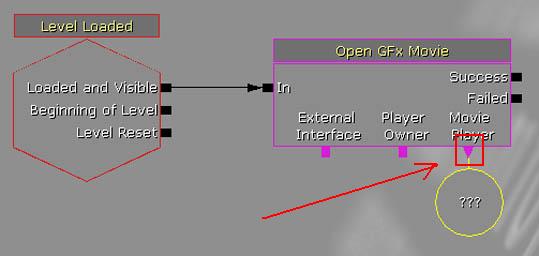
  • Right click the pink triangle tab under "MoviePlayer" and select "Create new object variable"
  • Left Click the Open GFx Movie widget
 

Assigning the Flash file to the widget.

In the properties window "GFx Action Open Movie" menu under "Movie" locate the Flash file you imported in your UDK installation in STEP 3. You will have to browse for the file first in the UDK Content Browser, (The magnifying glass icon is a shortcut), select the flash file in the Content Browser (Important) and then you will have to click the green arrow in the Open GFx Movie widget to add it.

  • Right click in the Kismet window and select "New Event" Select "GFxUI" then select "FsCommand"
  • Select the FS Command widget
  • Assign the flash file using the same steps above (Open browser, select the flash file, click the green arrow to add it etc..)
  • Under the topic FsCommand in the Fscommand widget, type in "exit". (Image left)
  • Right click in the Kismet window and select "New Action" select "Close GFxmovie"
  • Connect the FSCommand widget to the Close GFx Movie widget
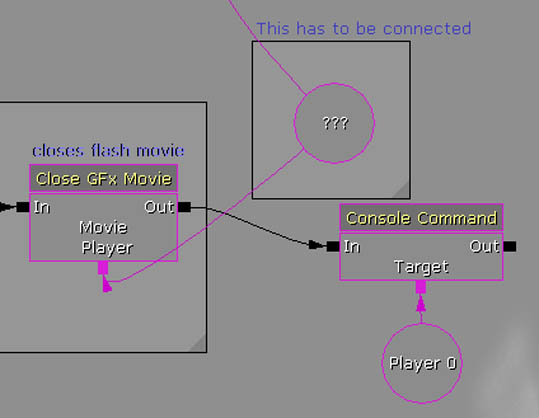
  • Click the small pink box on the bottom of the Close GFx Movie widget and connect it to the (???) var
  • Right click in the Kismet window and select "New Action" select "Misc" and Select "Console Command"
  • Connect Close GFx Movie widget to the Console Command widget
  • Select the Console command widget
  • Under Commands, click the green + sign
  • Type "exit" in the new added line marked:[0]
  • Right click in the Kismet window and select "New Action" select "Toggle" select "Toggle Input"
  • Connect the Level Loaded widget to the Toggle Input widget to "Turn Off"
  • Right click in the Kismet window below the Toggle Input widget and select "New Variable" select "Player" and select "Player"
  • Select the Player 0 widget and un tick "All Players" in the properties box.
  • Connect the "Target" box of the Toggle Input widget to the Player0 widget
  • Do the same steps for the Console Command widget (Add player0, un tick, etc.. Image left, above)


Now we need to create two more FsCommand widgets (I am sure you know how to by now so try this yourself.)  They will both need to be connected to a Console Command widget with a Player0 var. (Image left, below)

  • Click one of the two FsCommand widgets.
  • Under the topic FsCommand in the FsCommand widget, type in "load". (Note*This is for whatever loading system you use. The console command does nothing here except represent whatever save system you are going to attach to this FSCommand.)
  • Click the other FsCommand widget
  • Under the topic FsCommand in the FsCommand widget, type in "start".
  • Select the Console Command widget that is attached to this FSCommand widget and under Commands type in "open name_of_map_to_load" (Press the green + sign to add text if you cannot)
  • Make sure that the Console Commands and theToggle Input widget has got Player0 vars attached to them.(Image left below)


NOTE*

Name_of_map_to_load represents your map name. Don't add the " " punctuation marks either or it won't work. So add the name of the first map of your project you want to load when the Start Button is clicked. Also you must select "Play"-"On PC" or it will not load the map when you click it.

STEP FIVE

Left is an image of the set up that you should have by now. Check the image to see if your set up is the same and has all the correct widgets.

I guess it is time now to test your Kismet set up if it looks ready.

Select "Play from here" or "Play on PC"

Now your menu should have loaded. If you click exit the menu should close.

This hopefully is enough information for you to get you started. I really had fun making this for you and I wish you best of luck and I hoped it helped in some way.

HAVE FUN!!!!


[Top]

______________________________________________________________________

  All software packages created was used by the power of the Unreal Development Kit.

  In game loading screens created by using BINK VIDEO.

______________________________________________________________________

Comments on this site to: feedback@worldofdasm.com

Date Modified: 04/01/2016

© World of DASM, and the DASM series, created by Shane Hillier

.

© 2013-2016 all rights reserved