|
Welcome to the world of
DASM! For students who want to learn!
|
LINKS |
Building a Flash menu. |
|

|
Your own flash menu
You will need
Adobe Flash 5.0 or 5.5 full
version or the 30 day trial to continue this
tutorial. Before we can go any further, download
and install Adobe Flash 5.0 - 5.5. If you have
it already, download the file below so you have
the images to create the menu left below before
you continue.
DOWNLOAD:: Imboredimages.zip
|
|
Build all your Flash Menus within the FLASH folder
in your UDK install.
|
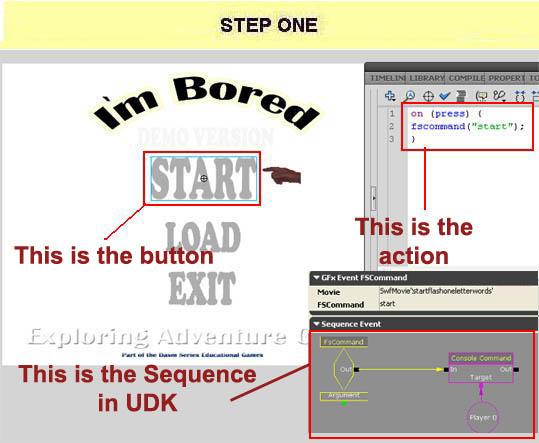
STEP ONE
This was
tested on
UDK-2013-07 &
UDK-2012-05 and used Adobe CS5.5
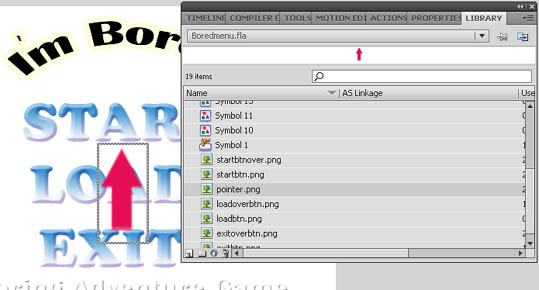
Within the file you downloaded there is are
8 zipped/ compressed
files. They are:
-
Mousepointer (Pointer)
-
Start and Start over image (Startbtnover,
Startbtn)
-
Exit and Exit over image (Exitbtn,
Exitoverbtn)
-
A
load and Load over image (Loadbtn,
Loadoverbtn)
-
Im
bored title screen image (Titlescreenbored)
Uncompress/Unzip these files and put the files
somewhere safe, we will need to add them to the
Library in Flash later.
Now the
biggest issue with Importing Flash files into
UDK is that the Flash file and the images need
to be in your UDK directory for it to work
correctly. For example:
C:\UDK\UDK-2012-05\UDKGame\Flash\(Projectname)\
So
this means that all Flash
files and image
files need to go into the
FLASH folder within
a folder with your (Projectname)
within the UDK
editor that you are currently using
especially if you have multiple installs.
|
|

|
STEP TWO
Start CS5.5 (This was used in this
demo)
We are
going to create a menu with Flash.
There are far better ways of doing this but I
am going to keep it basic so it is not too
confusing. When you understand how to do
this you will be able to create more complex
menus.
To get
started now
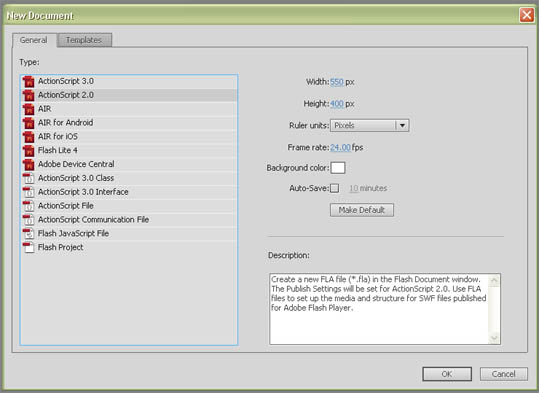
we want to click File then New.
Now follow
this list:
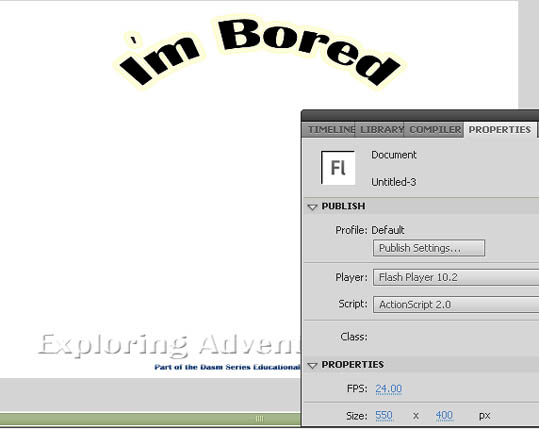
-
Select
ActionScript 2.0.
-
Width 550px
Height 400px(May
be default settings anyway)
-
Ruler
units Pixels
-
Frame
rate 24.00
fps
-
Background color white
-
Click OK
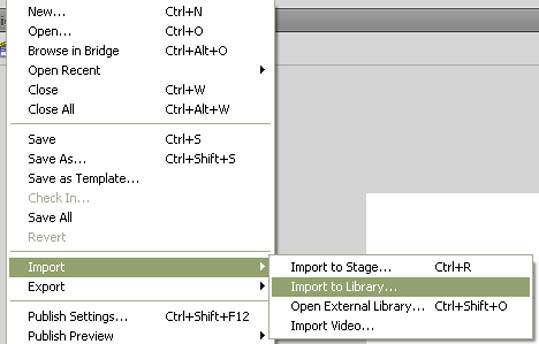
Now we
need to import the images you unzipped
earlier.
-
Click
File
-
Click
Import
-
Move
mouse over to Import to
Library
and click it
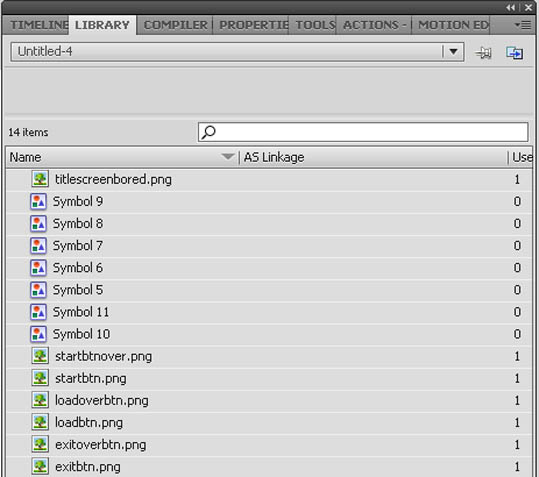
-
Locate the files you unzipped from the
download
-
While holding Left CTRL key,
select the files by clicking them. (This
lets you select multiple files.)
-
Click OPEN
The
files should now be in the Library.
Select the library tab, if you cannot see it
locate the "Window" menu at the top of
Flash and check to see if "Library" has a
tick next to it.
From
this Library we are going to drag and drop
files from it onto Flashes "desktop" and
then modify them into buttons, mouse
pointers etc.
|
|


|
STEP THREE
Select the file called "titlescreenbored".png
in the Library and drag and drop it to the
white box. As you can see the image is
larger than the box.
Select the image "titlescreenbored".png
you dragged if not still selected. Click the
"Properties" tab.
For
it's size type in 550 x 400 px.
Now the picture is smaller. Drag the picture
over the white box until it fits over the
top of it.
I
think it would be a nice time to save it
now. Go to File, Save As and
call it: "Boredmenu" click Save
|
|

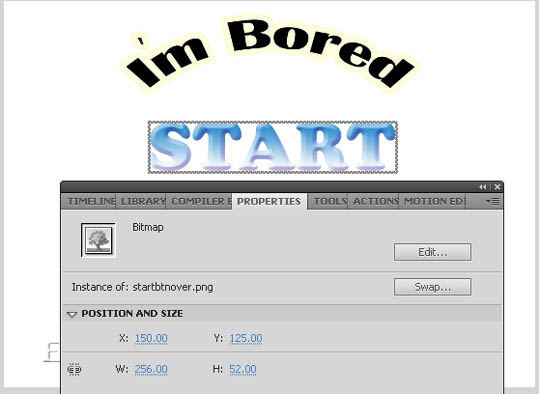
X=150 Y=125 W=256
H=52
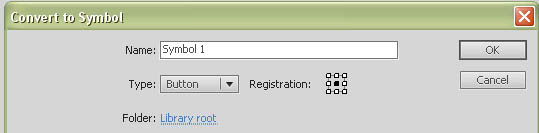
Right click the start image and select Convert to
Symbol
Double click the START image you turned into
a button.
Right click the small box under UP and select
Copy Frames
Paste Frames into the OVER and DOWN
boxes and re-select OVER
Select Copy Frames from OVER and
Paste Frames into HIT
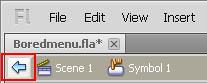
To exit Timeline click the light blue arrow
|
STEP
FOUR
Now we are going to add the start button.
Follow this list:
-
drag and drop the file called
startbtnover.png
-
Click the PROPERTIES tab while
the image is selected
-
For X type in 275.00
-
For Y type in 150.00
-
W
256.00 and H 52.00
This should position the START button.
Now, follow this list:
-
Right click the START image
-
Select Convert to Symbol
-
Leave the Name and
under
Type select "Button"
-
Check the middle box in the
Registration
-
Click OK
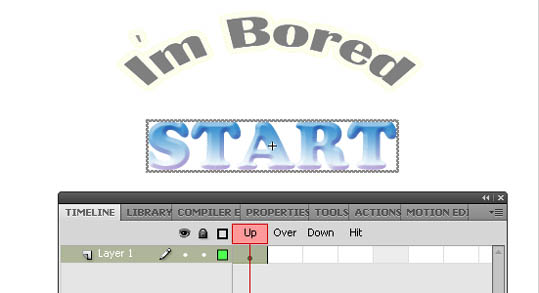
-
Click TIMELINE, if you cannot see
it make sure it is ticked under "Window"
and "Timeline" in the Flash menu.
-
Double click the START
button image
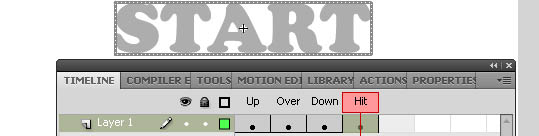
-
There will be four topics in the
Timeline, Up,
Over,
Down and Hit
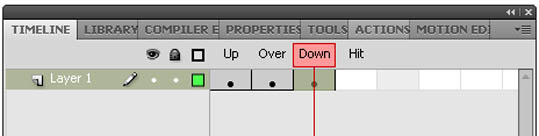
-
Right click the box under Up
and select "Copy Frame"
-
Right click under the word Over
and select "Paste Frame"
-
Right click under the word Down
and select "Paste Frame"
-
Left Click/Select the
"Over" box
-
While Over is selected,
right click the START image
-
Select "Swap Bitmap"
-
Select Startbtn and click "OK"
(Image will change)
-
Right click the box under over and
select "Copy Frames"
-
Right click under the word HIT
and select "Paste Frame"
-
Click the small blue arrow near the top
of the menu to exit Timeline
(Image left)
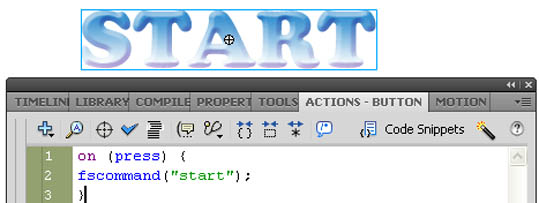
-
Click ACTIONS - BUTTON Tab
-
Copy then Paste
the text below into the action window;
on
(press) {
fscommand("start");
}
That is the first button finished. (Phew!)
|
|

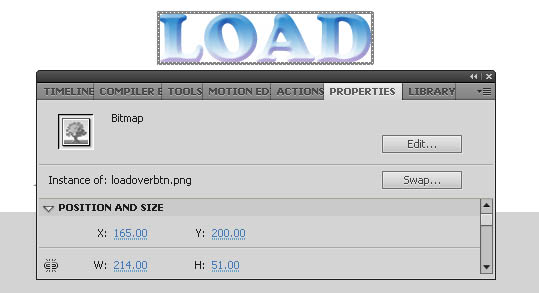
X=165 Y=200 W=214
H=51
Right click the load image and select Convert to
Symbol
Double click the LOAD image you turned into a
button.
Right click the small box under UP and select
Copy Frames
Right click under OVER and Paste
Frames
|
STEP
FIVE
Ok,
we have to do the same thing again very
simular to the start button.
-
drag and drop the file called
loadoverbtn.png
-
Click the PROPERTIES tab while
the image is selected
-
For X type in 165.00
-
For Y type in 200.00
-
W
214.00 and H 51.00
-
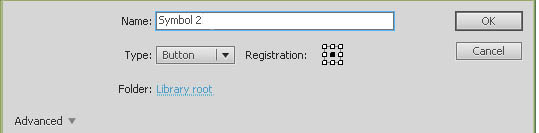
Right click the LOAD image
-
Select Convert to Symbol
-
Leave the Name and
under Type select "Button"
-
Check the middle box in the
Registration
-
Click OK
-
Click TIMELINE, if you cannot see
it make sure it is ticked under "Window"
and "Timeline" in the Flash menu.
-
Double click the LOAD
button image
-
There will be four topics in the
Timeline, Up, Over,
Down and Hit
-
Right click the box under Up
and select "Copy Frame"
-
Right click under the word Over
and select "Paste Frame"
-
Right click under the word Down
and select "Paste Frame"
-
Left Click/Select the "Over"
box
-
While Over is selected,
right click the START image
-
Select "Swap Bitmap"
-
Select loadbtn and click "OK"
(Image will change)
-
Right click the box under over and
select "Copy Frames"
-
Right click under the word HIT
and select "Paste Frame"
-
Click the small blue arrow near the top
of the menu to exit Timeline
-
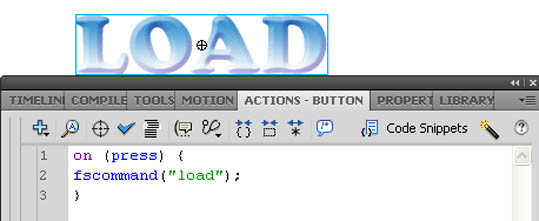
Click ACTIONS - BUTTON Tab
-
Copy then Paste
the text below into the action window
on
(press) {
fscommand("load");
}
 |
|

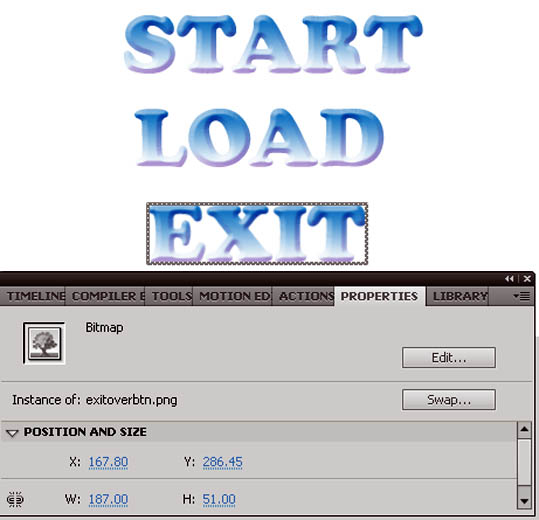
X=167.80 Y=286.45
W=187 H=51
Right click the EXIT image and select Convert to
Symbol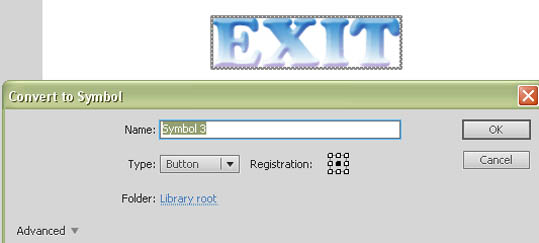
|
STEP SIX
Now for the final button.
-
drag and drop the file called
exitoverbtn.png
-
Click the PROPERTIES tab while
the image is selected
-
For X type in 167.80
-
For Y type in 286.45
-
W
187.00 and H 51.00
-
Right click the EXIT image
-
Select Convert to Symbol
-
Leave the Name and
under Type select "Button"
-
Check the middle box in the
Registration
-
Click OK
-
Click TIMELINE, if you cannot see
it make sure it is ticked under "Window"
and "Timeline" in the Flash menu.
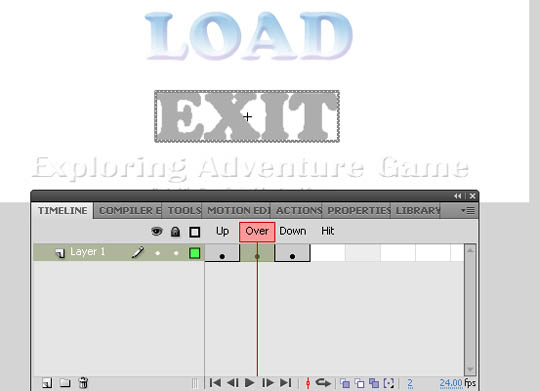
-
Double click the LOAD
button image
-
There will be four topics in the
Timeline, Up, Over,
Down and Hit
-
Right click the box under Up
and select "Copy Frame"
-
Right click under the word Over
and select "Paste Frame"
-
Right click under the word Down
and select "Paste Frame"
-
Left Click/Select the "Over"
box
-
While Over is selected,
right click the START image
-
Select "Swap Bitmap"
-
Select exitbtn and click "OK"
(Image will change)
-
Right click the box under over and
select "Copy Frames"
-
Right click under the word HIT
and select "Paste Frame"
-
Click the small blue arrow near the top
of the menu to exit Timeline
-
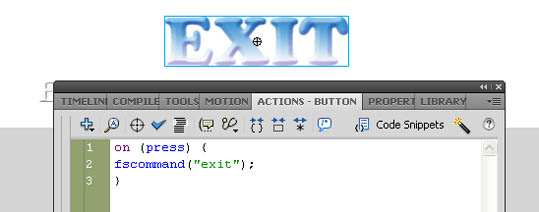
Click ACTIONS - BUTTON Tab
-
Copy then Paste
the text below into the action window;
on
(press) {
fscommand("exit");
}
 |
|

Note*During the test you can see a
white hand with the pointer. Don't worry this won't
be there when you import the Flash file later into
UDK
|
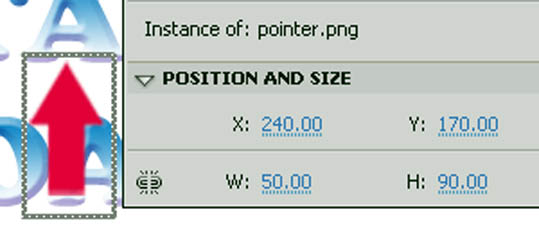
STEP SEVEN
Now for the Mouse.
-
drag and drop the file called
pointer.png in the middle of the
"I'm bored" image
-
Click the PROPERTIES tab while
the image is selected
-
For X type in
240.00
-
For Y type in
170.00
-
W
50.00 and H 90.00 (This
will shrink the pointer)
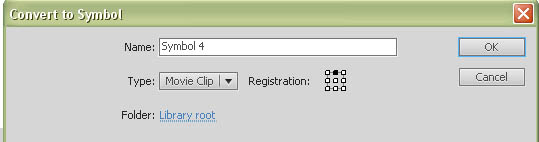
-
Right click the POINTER image
-
Select
Convert to Symbol
-
Under Type select Movie
Clip
-
Click the middle top square in
Registration
-
Click OK
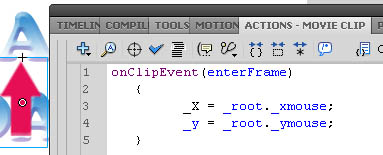
-
Right click the POINTER image
and pick "Arrange"
-
Click "Bring to Front"
-
Click ACTIONS - MOVIE CLIP Tab
-
Copy then Paste
the text below into the action window;
onClipEvent(enterFrame)
{
_X = _root._xmouse;
_y = _root._ymouse;
}
Test
Time!!!!
-
Go
to File and Save (If you
didn't save earlier go to File, Save As and
call it: "Boredmenu" click Save)
-
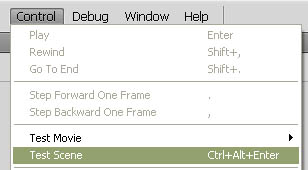
Click Control in the top menu
and select "Test Scene" (or Ctrl
+ alt + Enter on keyboard)
-
Check buttons to see if they change when
touched/clicked
-
Go
back and check any steps if it did not
run correctly
-
If
it works, click "File" then
"Publish"
NOTE*
Don't
forget all Flash files must be saved within
the FLASH folder directory in UDK or
Importing will not work properly
Click here to
learn how to add the flash file to UDK
|
[Top]
______________________________________________________________________
 |
All software packages
created was used by the power of the
Unreal Development Kit. |
|
 |
In game loading screens
created by using BINK VIDEO. |
______________________________________________________________________
|
|
Comments on this site to:
feedback@worldofdasm.com
Date Modified:
04/01/2016
© World of DASM, and the DASM series, created by Shane Hillier
.
© 2013-2016 all rights reserved
|