Welcome to the world of DASM! For students who want to learn!
|
LINKS |
Meshes are not solid |
||
|
|
|
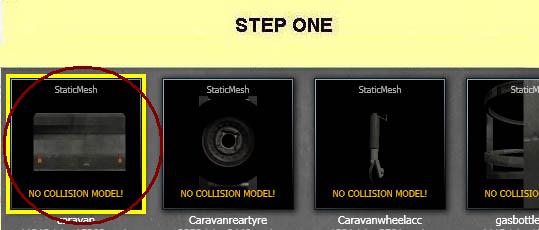
STEP ONE
Locate and select the mesh you wish to make solid. I will choose "caravan". From the caravan pack. Double click it or right click the image and select fully load near the bottom of the list. NO COLLISION MODEL! will be written at the bottom.
(Don't know how to install meshes, CLICK HERE.)
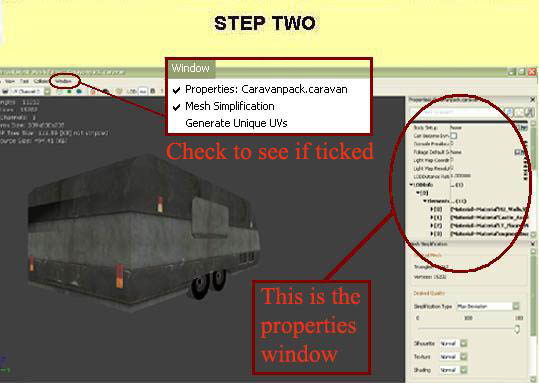
STEP TWO
Double click the image for it to load the Static Mesh Editor. If you cannot see the caravan in the editor mode you may have to minimise your content browser screen. (Image left is Static Mesh Editor mode. As instructed in red, locate the properties window. Now, make sure that the first option is ticked within the tab marked "Window".) From here I am going to show you two ways to make your meshes solid.
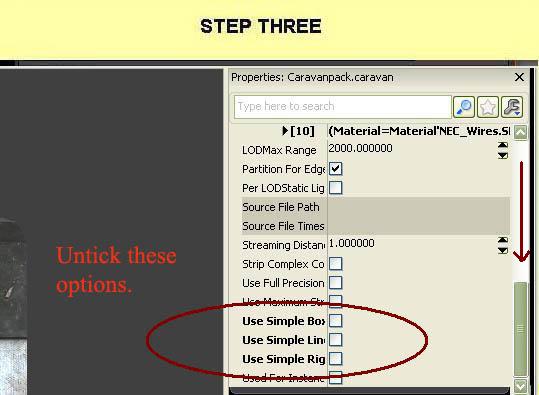
STEP THREE
METHOD 1:
Within the properties screen, if you cannot see the bottom 3 circled mesh options show left, scroll down the list as indicated with the red arrow. Remove the ticks from all three options.
*Note* This option will slow down your map rebuilding and testing especially when you click the "Build All" button. When the Swarm Agent runs it has to calculate the collision from the objects. More complex items, especially multiple trees for example, will slow this down even more. So when using this option, make sure you don't use it for really complex items or big maps.
Go to step Seven.
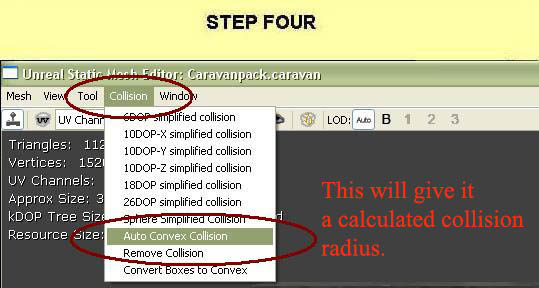
STEP FOUR
METHOD 2
Within the Static Mesh Editor is a collision tab.
Select the option "Auto Convex Collision." This will auto create an auto collision radius around the Static Mesh. Click "Apply", then "Close". Use "DOP-simplified collision" for box or square typed shapes. Also be patient, it does take a while to calculate sometimes.
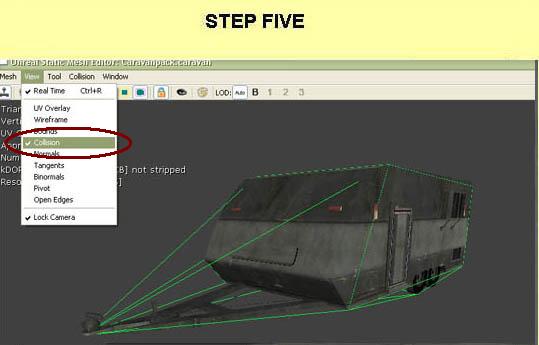
STEP FIVE
This step allows you to view the collision radius after selecting the "Auto Convex Collision" or "DOP-simplified collision" option. If you just removed the ticks from the bottom three mesh options you will not see anything with this selection. The reason why we check out our auto collision or DOP is to see if we are satisfied with the collision the mesh has been given. The green line in the picture left, show the collision radius of the mesh. To me this is satisfactory.
STEP SIX
You can also fine tune your meshes if your not happy with the auto collisions also. So if you go back to the Collision tab and select "Auto Convex Collision" You can turn up Depth, Max Hull Verts and allow Splits.
Just be aware the more you turn it up the more complex it becomes also. There has been times though where this option has fit some shapes quite well. So don't be shy to play around a bit if you like.
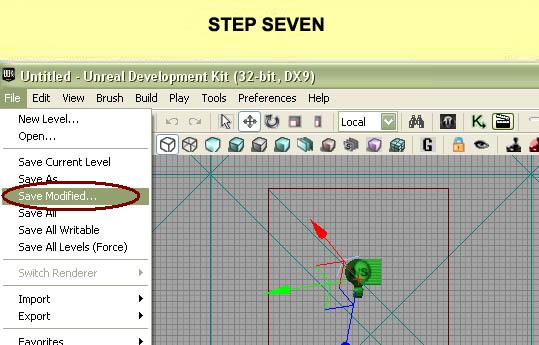
STEP SEVEN
Don't forget once you exit the Static Mesh Editor save any changes you have done. You can save it by selecting Save Modified but if you were in the middle of a project sometimes it's best to save all.
You can remove any collisions you have made too by going to the collisions tab within the Static Mesh Editor and selecting "Remove Collision". You will get a message saying, "Are you sure you want to remove the collision mesh?" Just click "yes" to accept.
[Top]

______________________________________________________________________
All software packages created was used by the power of the Unreal Development Kit.
In game loading screens created by using BINK VIDEO. ______________________________________________________________________


Comments on this site to: feedback@worldofdasm.com
Date Modified: 04/01/2016
© World of DASM, and the DASM series, created by Shane Hillier
.
© 2013-2016 all rights reserved