Welcome to the world of DASM! For students who want to learn!
|
LINKS |
STEAM Tutorials for your UDK3 Project |
|||
|
Visitor Counter
|
|
|||
Hello, how are you! When it came time for us to upload my UDK3 project to STEAM there were literally no proper tutorials for the UDK 3 Engine and STEAM integration. Especially since the release of UE4. We had a lot of difficulties in locating help or worthwhile tutorials on this topic and a lot of time was lost by trial by error. So here is a world first, (well maybe it is...) a tutorial covering most topics in uploading your UDK3 project to STEAM. If we did help you please support us by adding a link in your UDK project and letting other people know we are here! Know a family member who has a child having difficulties in learning? You can also support us by purchasing a copy of DASM Spell Quest. All proceeds will go towards supporting this website and the creation of other learning related products. Thank you.
Good luck and have fun!
STEP ONE. Rules for creating Badges.
What are badges? Badges can be viewed when collecting trading cards. Lets say you have 5 trading cards and all 5 trading cards have been collected. Once this happens your badge goes to the next level. This can happen up to another 5 times before you collect the last and final badge and display it in your STEAM account.
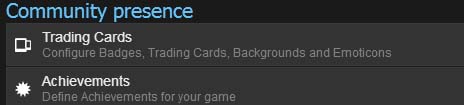
The below topic is found under community presence in your STEAMWORKS account.

Example above.
80x80 pixels. .png file.
transparent.
When creating badges for your game or project remember these most important rules:
- Your badge image should be related to something in or from your software.
- It needs to be 80x80 pixels.
- It should be transparent especially if your badge is not a perfect 80x80 square. (Example left.)
- You need to have 6 badges in total and make the last badge the "Greatest".
- It must be an image, letters and numbers are not acceptable.
- Your image must not breach a copyright and must be original.
Image shrunk to 80x80 pixels.
Start your picture editing software. This can be Gimp, Photoshop or even Ms paint. (Yeah I said it okay!)
Create a square 200x200 pixel square. (Alright, I am guessing you are thinking it should be a 80x80 pixel square but we are creating a larger square so it gives us some room to work with.) Always do your images larger than what they are supposed to be with badges or small images in general, this gives you more freedom to move things around and lets you see what you are doing. You can always shrink your badge at any time and view it at 80x80 to see your final result.
With the example left I have chosen a cross hair sight as my first badge rank. Now, I cannot give you a tutorial on what your image should look like. This is entirely up to you but I can show you how badges should vary from each level.
With the example left you can see a level 2 badge. For example; I am making a chicken hunting game. level one is just a plain cross hair. Level 2 (Image on the left), now shows a chicken. Then after level 3 (Second image on the left), we show a chicken drumstick with wings! (Sorry to all the vegetarians reading this!) If you have noticed the cross hair is missing. This does not have to be displayed in every image.
From here the rest of this tutorial is up to you. Since only 3 badges have been made 3 more still need to be created. Just remember you need 6 in total. Don't forget, when finishing each image save as a .png file.
STEP TWO Rules for creating Trading Cards.
What are Trading Cards? Trading Cards can be earned by playing games that you have in your STEAM account library. When a full sets of cards are collected they can be turned into game badges. Once turned into game badges you gain STEAM community items. You will need 2 images for this tutorial. One image is for your Trading Card and the other image is a large picture from where your Trading Card image comes from. You should create around 5 minimum to 15 maximum Trading cards for your project.
The below topic is found under community presence in your STEAMWORKS account.
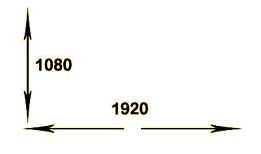
(1) When creating the Large Image for your game or project remember these most important rules:
- Your card images should be related to something in or from your software.
- Large Image needs to be 1920 pixels wide x 1080 pixels high, JPG, 350kb or less.
- Image must not be transparent.
- Try not to use screen shots but use art instead.
- Your image must not breach a copyright and must be original.
- Part of your large image should be displayed on your trading card.
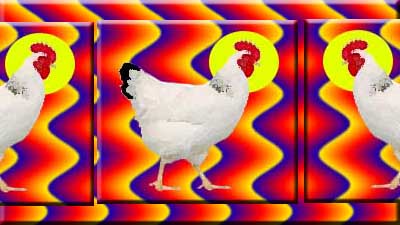
(2) Start your picture editing software. This can be Gimp, Photoshop or even Ms paint.(3) To start with, create a 1920 pixels wide x 1080 pixels high workspace. Now, create an image that goes into that workspace with those dimensions. Preferably, use some artwork related to your software in this workspace. (Screenshots are okay but not a good idea. If possible try to use personal artwork because it looks a little bit more professional.) It is not up to me what your image should be or what it should look like so I cannot give you a detailed tutorial on this but use common sense or even look at some examples within Google images.
As you may or may not have noticed part of the large image can be viewed on the trading card. Even though it is the centre of the image shown on the trading card it does not have to be like that. You can display any part of the large image on your trading card. You can also shrink it or enlarge it even, as long as it relates and identical to the large image and is displayed on your trading card.
206x184 png or jpg
Don't use transparency in the image but you can use transparency to feather your game name text to match the card colour if you wish.
(4) When creating Trading Cards for your game or project remember these most important rules:
- Your card images should be related to something in or from your large images.
- Card image needs to be 206x184 pixels, PNG or JPG file.
- Image must not be transparent.
- You should have a minimum of 5 cards and no more than 15 maximum.
- Try not to use screen shots but use art instead.
- Your image must not breach a copyright and must be original.
(5) Start your picture editing software. This can be Gimp, Photoshop or even Ms paint.
(6) To start with, create a 206x184 pixel workspace. If this workspace is too small for you make the image 412x 368 and shrink it down later. Locate a part of your large image that you want to display on your Trading Card. Shrink it or enlarge it to suit the dimensions you wish to display on your card. from here add your image to your 206x184 workspace and see if it all fits in.
The great feature about STEAMWORKS is that you can view what your Trading Card will look like before releasing it. (Image left.) There will be two types of cards displayed at the bottom of the Trading Cards. One will have a grey border and the other will have a blue border (*Note*-The blue border card is not displayed left.)
As a tip you can have the text background of your game name feather into the colour of your trading card so it looks like it is part of the card. (To do this you will have to save your file as a .png.)
STEP THREE. Rules for creating Backgrounds.
What are Backgrounds? Backgrounds are STEAM inventory items that can either be earned by playing or using software in your STEAM library or are earned by creating or crafting badges. You can also purchase them from the STEAM market or even trade them with friends. You should create 3 to 10 backgrounds in 3 categories. The categories are either; (1) Rare, (2) Common or (3) Uncommon.
The below topic is found under community presence in your STEAMWORKS account.
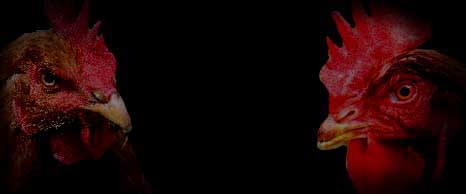
(1) When creating Backgrounds for your game or project remember these most important rules:
- The background should be dark and not too bright.
- 1920 pixels wide and between 800 to 1200 pixels high, JPG, and smaller than 350 kb.
- Your background should feather/ transition to black around the outside radius of your image.
- Screenshots are not advised and artwork is a better preference.
- Use something in your background that refers to your software.
- Your image must not breach a copyright and must be original.
(2) Start your picture editing software. This can be Gimp, Photoshop or even Ms paint. (But you will need to have software that can feather/transition images or use images and backgrounds that are dark.)
(3) Since a majority of monitors are in HD create a workspace of either 1920x 800 or 1920x1200 pixels. Select or create some images from your software but make sure they are quite dark. The reason why we have to do this is so when someone uses your background it won't conflict with the text that is displayed in a users STEAM account. While creating your background don't include any text or titles in it. (Left is an example of a background if I was making a game called "Killer Chicken". The images you use will be up to you but look at the examples left so you can gain a fair idea what you will need to create.
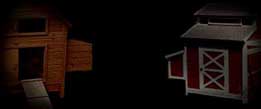
As a tip (but it is not recommended), you can try and take screenshots of your character or even backgrounds of your game and use them for your STEAM background images. Not everyone is good at art and some people will struggle to draw their own art so sometimes you have to make a choice. Left is another image of a background that does not have characters but displays the chicken coops from the game.
STEP FOUR. Rules for creating Emoticons.
What are emoticons? Emoticons are images that are normally given to a STEAM user after crafting badges. The higher the badge the better chance you have of receiving a rare or uncommon emoticon. Like backgrounds there are common, uncommon and rare emoticons. Once you earn an emoticon you can display it in a chat channel by using a simple code. (For example ":emoticon_name:" but minus the quotes. )
The below topic is found under community presence in your STEAMWORKS account.
1)
54x54
18x18
BAD
When creating emoticons for your game or project remember these most important rules:
- Your emoticon image should be related to something in or from your software.
- You will need two images, one image at 18x18 pixels and the other 54x54 pixels PNG file.
- It can be transparent depending on what the image is. (Example left.)
- Photos and screenshots are no good, it should be pixel art and an image of something.
- You must have at least 5 minimum and 10 maximum.
- Your image must not breach a copyright and must be original.
2)
54x54
18x18
NOT TOO BAD
Start your picture editing software. This can be Gimp, Photoshop or even Ms paint.
Create a square 108x108 pixel square. (We are creating a larger square so it gives us some room to work with.) Always do your images larger than what they are supposed to be with emoticons or small images in general, this gives you more freedom to move things around and lets you see what you are doing. You can always shrink your emoticon at any time and view it at 18x18 or 54x54 to see your final result.
If your good at art, draw your image using no more that 256 (8 bit) colours if possible. (16 bit max). Or, depending on the software you are using you can cheat a little. first I don't recommend this but if you are really bad at art you can take a screenshot of something and convert it to 256 colours. Once you are finished, save your 108x108 image as a 54x54.png file. Then save your file again with a different name and change the dimensions to 18x18.png file. Have a good look at it after and make sure it doesn't look too cluttered.
The images left shows some examples numbered from 1 to 4. This emoticon example is a Chicken house.
- Number 1) at the top is a picture that has been shrunk and it also has had its colours reduced to 256. As you can see once it is shrunk to 18x18 it looks a little messy. This isn't what you would normally use as an emoticon.
- Number 2) is a little bit better. Some details have been removed and the image is a little clearer.
- Number 3) is a picture I have drawn. This image does not have major detail and is clear even shrunk. This is what most emoticons are like. They are completely drawn by hand or by using shapes.
- Number 4) shows 2 emoticon images and they are enlarged to show you that the smallest of details can make an effective picture.
Don't forget also, your emoticon must have a name so it can be activated in a STEAM chat channel. Sometimes the names are already taken therefore you cannot use them so you might have to compromise. The commands to activate your emoticon can look like this for example; :chookhouse: or :chickenhouse: for the chicken leg you could use; :chookleg: or :chickenleg: (*Note*-The colon added to the name is very important and must be typed with your emoticon name or it will not work.)
3)
54x54
18x18
GOOD
(4)
Some basic details can make a big difference in your emoticons.
STEP FIVE Rules for creating Achievements.
What are achievements? STEAM achievements are like a small badge like image that comes with most games on STEAM. (Not all.) It is really recommended to have these with your project since it is a way of showing your friends and/or other STEAM members that you have unlocked certain tasks within a software package that you have purchased or been given as a gift in STEAM.
The below topic is found under community presence in your STEAMWORKS account.
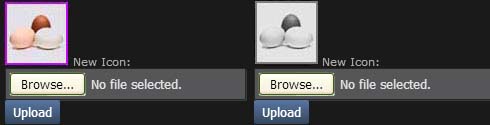
Coloured
Greyscale
When creating achievements for your game or project remember these most important rules:
- Your emoticon image should be related to something in or from your software.
- You will need two identical images one with colour and the other greyscale.
- Both images must be 64 pixels by 64 pixels and a JPEG.
- Screenshots, pixel art or self drawn art can all be used.
- Try to have at least 20-30 achievements but the amount is up to you.
- Your image must not breach a copyright and must be original.
Bordered
Greyscale
Start your picture editing software. This can be Gimp, Photoshop or even Ms paint.
Create a 128 x 128 pixels square if you are going to draw your achievement since this will give you more room to work with. Shrink you image to 64 x 64 pixels once you are finished. If your using a screenshot (which I don't really recommend), leave your image at 64 x 64 but shrink your screenshot to fit, but make sure you can clearly see the image still and that it does not seem too crowded. I cannot tell you what to add or what to draw for you achievements so this will be entirely up to you.
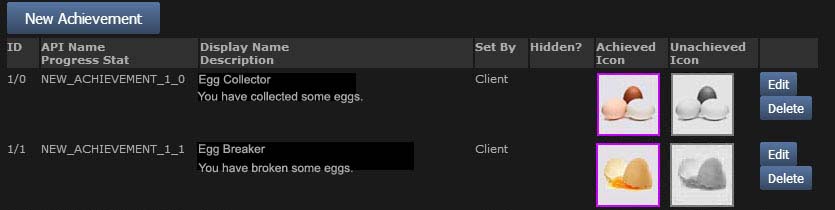
Left are some examples of achievements from our imaginary "chicken game" we have used in all the tutorials on this page. These are the type of images that you could use for your project. Feel free to add borders or anything else to your achievement that you think will make it look more appealing.
Achievements can be screenshots if you want but try to be consistent. If you are going to use screenshots you should try to make the rests of your achievements screenshots. Same with artwork, if your going to use artwork make sure all your achievements are the same. Overall there are no rules and regulations to how your achievements should look but make sure they are at least appealing.
You could even try making achievements like I did for DASM Spell Quest where the colours are limited. Left is an example of the ice skate achievement you earn once you purchase the ice skates. There was a maximum of 4 to 5 colours used to create this achievement image and I kept it the same with all of the other achievements also. Best of luck!
Adding code for your Achievements to UDK3.
It is time to add your achievements now that you have created the images. Will will need to upload your images to STEAMWORKS. Then we will have to setup the files in your UDK editor. After that we will have to setup kismet in your project. And the last step is adding some code in two text documents within UDK so STEAM can identify your achievements. Remember to back up any files you are going to modify also. This is handy especially if you make a mistake. Are you ready?......Lets Go!
The below topic is found under community presence in your STEAMWORKS account.
- Log into STEAMWORKS
- Under the topic Community Presence click on "Achievements".
- Click on "New Achievement"
- Upload your achievement by clicking on Edit with the new achievement you added. (Achievement image tutorial is here)
- Click on Upload and add your achievements.
- Add a description under the topic "Display name Description".
*The achievement ID is listed left*
- Under the topic "Set By" leave it as "Client"
- Leave the "API Name Progress Stat" the same since it relates to this tutorial.
- Leave "Hidden?" un-ticked.
- Click save.
- Repeat steps for all achievements.
*NOTE*- Notice the ID going from 1/0 to 1/1. This indicates the first STEAM Achievement ID is 0 then 1 then 2 etc.
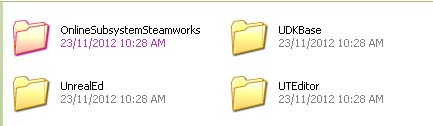
Place folder in: \UDK\UDK-(Your-version-install)\Development\Src
SETTING UP YOUR UDK EDITOR FOR STEAM ACHIEVEMENTS
It is time now to setup the UDK editor so STEAM can identify your achievements. But for this to work we will have to install some software first.
Download this file here: KismetOnlineSubsystem.zip
Extract it and add it to the Src folder in your UDK installation. Lets say for example your UDK installation is on c:\ drive and your using the 2012 editor. The folder we are looking for would be in: C:\UDK\UDK-2012-05\Development\Src
Locate file in: \UDK\UDK-(Your-version-install)\UDKGame\Config
DON'T FORGET TO BACKUP ANY FILES YOU MODIFY!
Add the line: +EditPackages=KismetOnlineSubsystem
It is time to tell UDK that we have a modification in our Src folder.
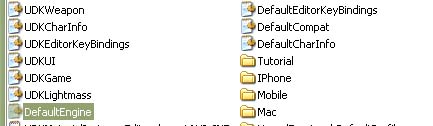
Locate the DefaultEngine file. (And make a backup of it!). Once again we are going to say for an example we installed our UDK editor on c:\ drive and using the 2012 version editor the path would be: C:\UDK\UDK-2012-05\UDKGame\Config
Open the file using notepad or notepad++ to edit it with.
In your notepads search engine add the following text: [UnrealEd.EditorEngine] or scroll down the list until you see that topic in the list.
Add the line: +EditPackages=KismetOnlineSubsystem within this topic and save the file. (You may have other mods installed here already so the image left is just an example.) Now wait! Don't close this file off yet.
It is time now to tell STEAM what each achievement id is within the DefaultEngine file.
In your notepads search engine add the following text: VOIPVolumeMultiplier= or scroll down the list until you see that topic in the list.
- Delete all the text below the sentence VOIPVolumeMultiplier= that can be seen in the document. (Example Below.) These files are achievements for Unreal Tournament and may conflict with your achievements. But do not delete: [OnlineSubsystemSteamworks.OnlineGameInterfaceSteamworks] or anything under it.
- Replace the deleted text above with the text below. Make sure that as you add achievements the achievement Id number goes up. If you have 100 achievements than you will have to go all the way up to 100. (The text below only represents 4 achievements so you will have to manually modify the text as you go.) Save the file once you are finished.
+AchievementMappings=(AchievementId=0,AchievementName=NEW_ACHIEVEMENT_1_0,ViewId=30,ProgressCount=0,MaxProgress=0,bAutoUnlock=True)
+AchievementMappings=(AchievementId=1,AchievementName=NEW_ACHIEVEMENT_1_1,ViewId=30,ProgressCount=0,MaxProgress=0,bAutoUnlock=True)
+AchievementMappings=(AchievementId=2,AchievementName=NEW_ACHIEVEMENT_1_2,ViewId=30,ProgressCount=0,MaxProgress=0,bAutoUnlock=True)
+AchievementMappings=(AchievementId=3,AchievementName=NEW_ACHIEVEMENT_1_3,ViewId=30,ProgressCount=0,MaxProgress=0,bAutoUnlock=True)There is still one more file to modify. This file (to me I could be wrong!), is like a backup file if something goes wrong with changing the text in the DefaultEngine file. Somehow this file seems to overwrite DefaultEngine and reverts it back to its default text again. So in this tutorial we are going to modify this file also. (And make a backup of it!)
- For example in the same folder as the file DefaultEngine ("\Config" folder), locate the file; UDKEngine. Open the file using notepad or notepad++ to edit it with.
In your notepads search engine add the following text: VOIPVolumeMultiplier= or scroll down the list until you see that topic in the list. (It is near the bottom.)
You may or may not have noticed that the text above is slightly different to the text shown in the previous image example. There is no "+" sign in front of the text. When replacing any text in this document remove any + signs at the front of the sentences.
- Replace the deleted text above with the text below. Make sure that as you add achievements the achievement Id number goes up. You could even copy and paste the text from the other document but remove the + sign.
- Save the file. This should now stop your other document from reverting back to its original text if something happens and UDK tries to rewrite it.
AchievementMappings=(AchievementId=0,AchievementName=NEW_ACHIEVEMENT_1_0,ViewId=30,ProgressCount=0,MaxProgress=0,bAutoUnlock=True)
AchievementMappings=(AchievementId=1,AchievementName=NEW_ACHIEVEMENT_1_1,ViewId=30,ProgressCount=0,MaxProgress=0,bAutoUnlock=True)
AchievementMappings=(AchievementId=2,AchievementName=NEW_ACHIEVEMENT_1_2,ViewId=30,ProgressCount=0,MaxProgress=0,bAutoUnlock=True)
AchievementMappings=(AchievementId=3,AchievementName=NEW_ACHIEVEMENT_1_3,ViewId=30,ProgressCount=0,MaxProgress=0,bAutoUnlock=True)
SETTING UP KISMET
Now for the final step, setting up Kismet. Hopefully everything here is all setup correctly and ready to go!
Start UDK
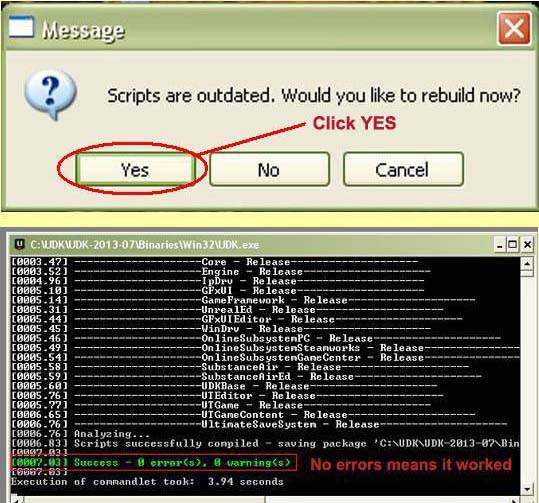
Because we finished modifying and added files in our UDK installation it "should" tell you the "Scripts are outdated. Would you like to rebuild now?" Click "Yes"It will check the scripts for any errors.
Be patient while it does its work. If there are no errors it will say:; success - 0 error (s), 0 warning (s) If there is an error check that there is no spelling mistake where you added the text earlier: +EditPackages=KismetOnlineSubsystem
Close the script message by clicking x in the top right corner.
You should now have some new widgets in UDK.
Restart UDK after it has compiled the scripts.
Open Kismet
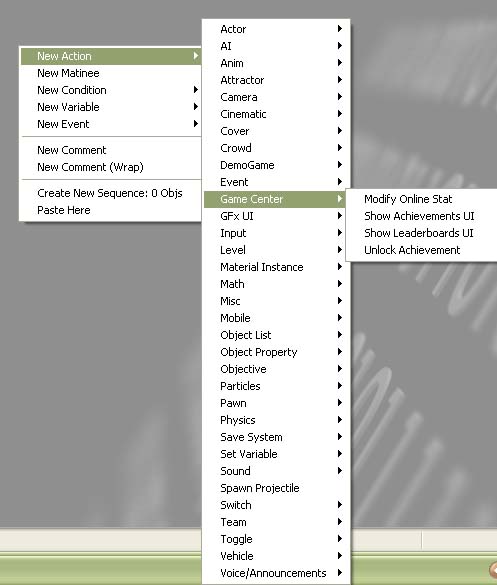
Right click in the Kismet screen and select "New Action"
Locate "Game Center" in the list and select it and you should see a list of widget commands.
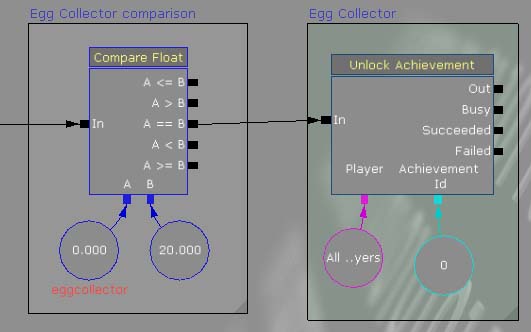
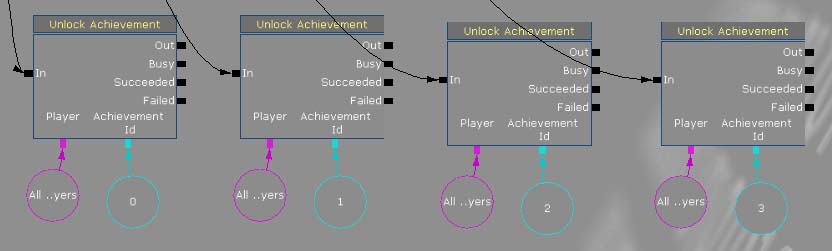
Below is an image of some widgets set up to unlock an achievement. You would have some sort of comparison or "trigger" first and if it is touched or matches it should then unlock your achievement.
If you require a tutorial on how to set your widgets up then it might pay for you to take a look HERE this is the Kismet Online Subsystem webpage. In the image below is an example to how you set your STEAM achievement up. Just like in STEAMWORKS your first achievement starts from 0 and works it way up.
Make sure that each Achievement Id matches the trigger that activates it or you might unlock achievements that were not related to what you did.
Good luck and congratulations on your product. If we did help you at all please provide a link of us in your projects credits. Thank you!
Uploading your UDK3 project.
STEAMWORKS is a requirement that is needed for you to upload your UDK3 project to STEAM. You must log in before you can do this so lets go ahead now and install it.
1)
2)
3)
4)
5)
How to log into STEAMWORKS.
Run steamcmd
Wait for any updates.
Type Login "USERNAME" and press enter.
Type in your password and press enter.
Wait for STEAM prompt.
- Click the STEAMWORKS link HERE to access the website.
- Log in with your usual STEAM account that is related to your project.
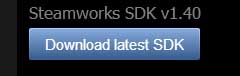
- On the right column, locate the button Download latest SDK. (Example right.)
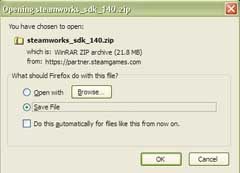
- You will be prompted to save a file called "steamwork_sdk_(version).zip" *NOTE*- Because STEAMWORKS is always updated we will use the word (version) instead of showing a version number.
- Once it is downloaded, open the zipped folder and you will see a folder called "SDK"
- I don't know about your preferences but I like to add my SDK folder directly into my C:\ drive. It's easy to find and access it if I am in a hurry. So drag and drop the SDK folder onto your C:\ drive or wherever you wish to.
Now from this point we may need to run some updates and adjust a few things even though you may have the latest SDK files.
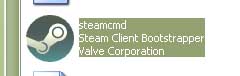
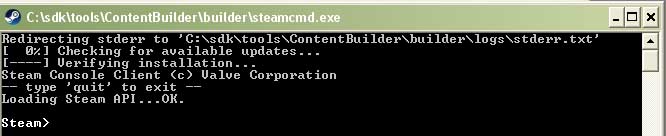
- Open the SDK folder and locate this directory (I am using the C:\ directory as the example): C:\sdk\tools\ContentBuilder\builder. Double click the icon called: "steamcmd.exe" and wait for it to run.
- Above is an image of STEAM cmd. It will check for available updates first before running. Your install may require an update and this can take a while. Once the update is finished you will have the Steam> prompt.
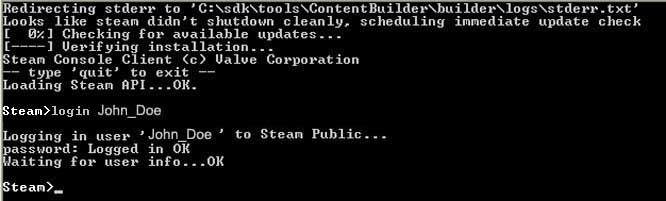
- In the image below is an example on how to log in. I am going to say for example, my STEAM account name is John_Doe. So we type in; Login John_Doe (Press Enter on keyboard). Now the password is tricky. You will be asked to add your password but you cannot see what you are typing. Don't worry though, if your password is typed correctly just press enter on your keyboard after and you will log in. Once the STEAM prompt is shown you are 100% logged in. But for now, close steamcmd by typing "quit". Now lets go to the next tutorial below, uploading your project!
Uploading your UDK3 project to STEAM.
HINT - Right click the files above and select "edit with notepad++" to modify the files or edit with "Notepad".
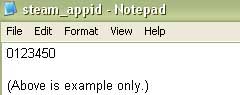
Okay now it is time to upload your UDK project but we need to check something quickly first. In this example below we are going to "imagine" our app id is 0123450.
- Open your UDK project or UDK editor (If you have not packed your game yet), and locate the file called: steam_appid. This file need to be changed to your projects "app id" that STEAMWORKS would have provided you with. Your app id can be found at the end of your game name in brackets in STEAMWORKS. For example: "Yourgamename(0123450)".
- The steam_appid file can be normally found here: UDK\Yourgamename\Binaries\Win32. This is the only file called with this name in your UDK project so if you cannot find it just do a search for it.
- Open the file steam_appid and delete the numbers that are in there and replace them with yours and save it. Okay that's it, done. This is important because it allows STEAM to understand what app your project is.
The next part of this tutorial gets tricky so pay attention because if anything is wrong your upload will not work and you will get error messages. You will need to modify these files with notepad or something similar.
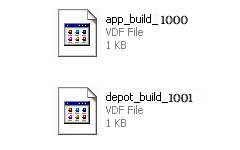
- In your SDK folder there are two files. They are located at: sdk/tools/ContentBuilder/scripts. The files are called; app_build_1000 and depot_build_1001. You don't have to do this but we are going to rename those files to suit your project. This is handy to do especially if you have more than 1 project. So for example your project app id is 0123450 we will change its name to; app_build_1000 to app_build_0123450. We will also change; depot_build_1001 to depot_build_0123451. To change the filenames just click on the file so there is a flashing cursor in the name text box and retype the name to match your app id and repeat with the other file.
- We have to change the script in the files below now to match your project. The scripts can be edited by either using notepad or you can install notepad++ which is what I really recommend for this type of work. The script on the left is the original script and the script on the right is an example to what you have to change it to.
ORIGINAL SCRIPT
(BELOW) This is what the current script in the file :"app_build_1000.vdf" will look like if you open it. The script on the right shows what changes you need to make for your script to work.
NEW SCRIPT
(BELOW) Yet again for example only, if your app id was 0123450 then you will change the script on the left to look like this. Edit your file now to be similar to below but use the app id STEAM provided you then save it.
"appbuild"
{
"appid" "1000"
"desc" "Your build description here" // description for this build
"buildoutput" "..\output\" // build output folder for .log, .csm & .csd files, relative to location of this file
"contentroot" "..\content\" // root content folder, relative to location of this file
"setlive" "" // branch to set live after successful build, non if empty
"preview" "0" // to enable preview builds
"local" "" // set to flie path of local content server
"depots"
{
"1001" "depot_build_1001.vdf"
}
}"appbuild"
{
"appid" "0123450"
"desc" "Your build description here" // description for this build
"buildoutput" "..\output\" // build output folder for .log, .csm & .csd files, relative to location of this file
"contentroot" "..\content\" // root content folder, relative to location of this file
"setlive" "" // branch to set live after successful build, non if empty
"preview" "0" // to enable preview builds
"local" "" // set to file path of local content server
"depots"
{
"0123451" "depot_build_0123451.vdf"
}
}(BELOW) This is what the current script in the file :"depot_build_1001.vdf" will look like if you open it. The script on the right shows what changes you need to make for your script to work. (BELOW) Yet again for example only, if your app id was 0123450 then you will change the script on the left to look like this. Edit your file now to be similar to below but use the app id STEAM provided you then save it. Make sure that the line with "ContentRoot" matches your directory. Be aware that "C:\sdk\tools\ContentBuilder\content" is used in this example. "DepotBuildConfig"
{
// Set your assigned depot ID here
"DepotID" "1001"
// Set a root for all content.
// All relative paths specified below (LocalPath in FileMapping entries, and FileExclusion paths)
// will be resolved relative to this root.
// If you don't define ContentRoot, then it will be assumed to be
// the location of this script file, which probably isn't what you want
"ContentRoot" "D:\MyGame\rel\master\"
// include all files recursivley
"FileMapping"
{
// This can be a full path, or a path relative to ContentRoot
"LocalPath" "*"
// This is a path relative to the install folder of your game
"DepotPath" "."
// If LocalPath contains wildcards, setting this means that all
// matching files within subdirectories of LocalPath will also
// be included.
"recursive" "1"
}
// but exclude all symbol files
// This can be a full path, or a path relative to ContentRoot
"FileExclusion" "*.pdb"
}"DepotBuildConfig"
{
// Set your assigned depot ID here
"DepotID" "0123451"
// Set a root for all content.
// All relative paths specified below (LocalPath in FileMapping entries, and FileExclusion paths)
// will be resolved relative to this root.
// If you don't define ContentRoot, then it will be assumed to be
// the location of this script file, which probably isn't what you want
"ContentRoot" "C:\sdk\tools\ContentBuilder\content"
// include all files recursivley
"FileMapping"
{
// This can be a full path, or a path relative to ContentRoot
"LocalPath" "*"
// This is a path relative to the install folder of your game
"DepotPath" "."
// If LocalPath contains wildcards, setting this means that all
// matching files within subdirectories of LocalPath will also
// be included.
"recursive" "1"
}
// but exclude all symbol files
// This can be a full path, or a path relative to ContentRoot
"FileExclusion" "*.pdb"
}
REMEMBER - After you have finished editing the scripts, don't forget to save them!
We are at the final stages now but lets do a quick review from our imaginary account.
- We have modified a file called app_build_1000.vdf and renamed it to app_build_0123450.vdf
- We have modified a file called depot_build_1001.vdf and renamed it to depot_build_0123451.vdf
- We have modified the scripts in both files to match our app id.
- We have checked our directory is "C:\sdk\tools\ContentBuilder\content" in the depot_build_0123451.vdf file.
- REMEMBER ABOVE IS AN EXAMPLE ONLY USE YOUR APP ID FOR YOUR OWN PROJECT BUILD NOT 0123450
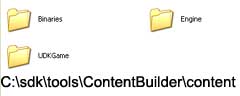
Once you have packed your game with Frontend and installed it on your PC, we want to now transfer 3 folders into this directory: C:\sdk\tools\ContentBuilder\content.
Because in STEAMWORKS you can custom name your project folder to where your files go, in this tutorial I chose just to copy over the three basic folders that come with a UDK project. Those folders are Engine, UDKGame and Binaries. So for now copy those three folders, (and any other folders if you have modified your project), into the SDK \contents folder. (BELOW LEFT)
(LEFT) Locate your UDK project and copy these three folders into it. We did not copy the folder over that was installed with them, (your project name folder) only the main content. You don't have to do this if you wish. You can copy everything over but this way it is easier to locate the .exe so STEAM can run the game in the library and create a shortcut.
Once you have done this it is time to upload your content to STEAM! Okay now let's log into STEAMWORKS using the steamcmd command located at: C:\sdk\tools\ContentBuilder\builder
Run steamcmd.
Wait for any updates.
Type Login "USERNAME" and press enter.
Type in your password and press enter. (Remember you can't see what your typing!)
Wait for STEAM prompt.
Now we need to guide STEAM to where our files are. Remember we are using an imaginary app id in this example, you will need to replace the numbers with your app id. We need to type out in steamcmd the following command:
run_app_build C:\sdk\tools\ContentBuilder\scripts\app_build_0123450.vdf
(Press Enter on your keyboard after typing or copying the code.)
Lets break this code down so you know what it is doing.
run_app_build = This lets STEAMWORKS know what command it is going to do. (Run and view the script.)
C:\sdk\tools\ContentBuilder\scripts = This guides STEAM to where your script files are.
app_build_0123450.vdf = What script file to run.
If everything is done correctly it will read your files first and map them. After it has finished mapping it will upload them. Try not to disturb your PC while it is doing this. It can sometimes take a while too depending on your internet speed and the size of your project. If you have an error message shown instead try these following things:
Does your directory match with the directory that is stated in the file "depot_build_0123451.vdf". If the directory does not match it will not work.
Did you copy your UDK files in the correct folder? This can cause a problem since it cannot locate the files.
Did you use the correct app id? Maybe you got yours mixed up with the one in this tutorial? Check your app id again in the two files called depot_build_0123451.vdf and app_build_0123450.vdf.
Did you forget to rename the files or did you rename them incorrectly?
Does the filename match with the filename you typed in the code above? (Just make sure they match.)
If your still having problems post the error message to me along with your app id and the two .vdf script files. Maybe I can help? contact@worldofdasm.com
If you have no error messages then congratulations you have successfully uploaded your UDK project to STEAM!
Adding a custom Game Name folder to STEAM.
If you have been following this tutorial earlier we added 3 folders to our SDK\ folder. Those 3 folders were; Engine, UDKGame and Binaries. These are the main 3 folders you find in a UDK project once you open it. In this tutorial we have decided to remove the folders that are installed with the UDK project. (For example you installed your project and its directory is; C:\UDK\Your_Project_Name_.) You can leave your folders the same if you like but we are showing you a different way of doing things, especially by removing the "UDK" folder that comes with your install. Okay it's time now to start creating our own STEAM custom project folder.
The below topic is found under technical tools in your STEAMWORKS account.
(1)
(2)
Follow these steps to create a custom folder:
- Log into your Steamworks account.
- (1) Under the topic "Technical Tools" select "Edit Steamworks settings."
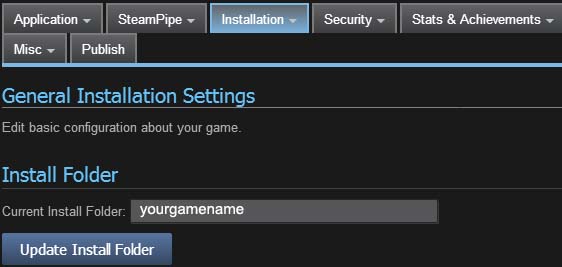
- (2) Select the Installation tab and select "General" in the dropdown list.
- Under the topic "Install Folder", click in the text box marked with: "Current Install Folder" and type in what you want to call your project name folder. Click "Update Install Folder" after.
- (3) We have to publish the changes now for them to take place. Click the "Publish" tab at the top. Now click the "Prepare for Publishing" button displayed on that page. Steamworks will do a quick check to make sure that there are no conflicts or simular names with your project name.
(3)
- (4) Once Steamworks has finished checking for any conflicts you have one last final step. You will be provided with a text box with the words "Really Publish" on the right of it. In this text box type "STEAMWORKS" and click the "Really Publish" button. That it! You have created your custom game folder!
(4)
Setting up your exe for the STEAM library.
One problem we can have while setting up our project in STEAM is getting the STEAM library to locate our exe. So I though this tutorial might come in handy for you. This tutorial is a continue on from the tutorial above. So if the project you are trying to add has a project folder the tutorial below will not work for you. But for example if you did have a project folder the command below under the topic "Executable (?)" would be more like: your_folder_project_name\Binaries\Win32\udk.exe. And as another example if your exe name has been changed you would have: your_folder_project_name\Binaries\Win32\your_exe_name.exe. And always remember:
"ALWAYS PUBLISH YOUR WORK AFTER YOU MAKE CHANGES OR IT WONT WORK!!"
The below topic is found under Technical Tools in your STEAMWORKS account.
(A)
(B)
*NOTE*- Under the topic "Operating System(?)" if your software uses other types of operating systems make sure you select it in the dropdown list.
(C)
(D)
How to add your exe.
Log into your Steamworks account.
(A) Under the topic "Technical Tools" select "Edit Steamworks settings."
Select the Installation tab and select "General" in the dropdown list.
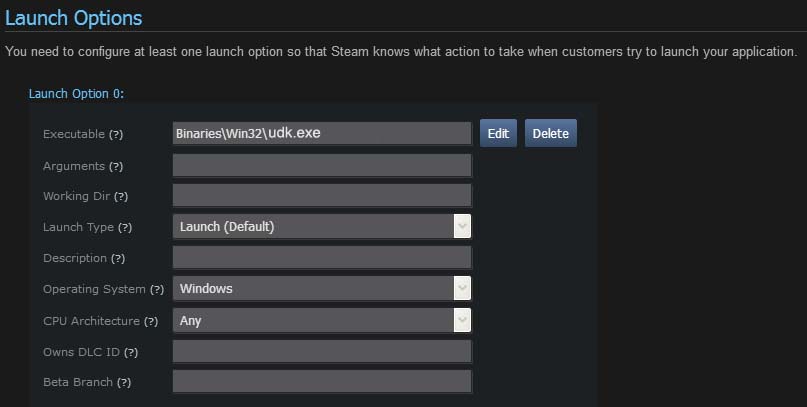
(B) Under the topic "Launch Options" find the text box with "Executable (?)" next to it and click the "Edit" tab on the right.
The text boxes should be white now and can be edited. Put the following text: Binaries\Win32\udk.exe in the text box marked "Executable (?)"
Check the Launch type, Operating system and CPU Architecture and make sure they match the image left.
Click update.
(C) We have to publish the changes now for them to take place. Click the "Publish" tab at the top. Now click the "Prepare for Publishing" button displayed on that page. Steamworks will do a quick check to make sure that there are no conflicts or simular names with your project name.
(D) Once Steamworks has finished checking for any conflicts you have one last final step. You will be provided with a text box with the words "Really Publish" on the right of it. In this text box type "STEAMWORKS" and click the "Really Publish" button. And that's it!
How to patch your UDK project in STEAMWORKS.
You have your project on STEAM and "OH NO!" you have found out there is a bug in your project or a bug has been reported. Looks like your going to have to patch your game but how do you do it? Actually it is really quite simple! Basically you upload your project again after making changes. But there are some rules in doing this though as you will read below.
The below topic is found under Technical Tools in your STEAMWORKS account.
Rules for uploading over the top of your previous upload. (Patching your previous project.)
UDK can get a little bit "dodgy" or "sketchy" when adding files without running them through Frontend first. There are ways around this but when your in a hurry it is a lot easier just to run Frontend and reinstall your UDK project from scratch, especially if you have made a lot of changes.
Completely run your UDK project through "Frontend" again once you have fixed the bugs.
Package your project "Again"
Install it somewhere on your PC, "Again"
Paste your 3 folders in \sdk\tools\ContentBuilder\builder like in the above tutorial, "Again".
Run STEAM cmd and Log in. (If sdk is installed on C:\ it is located at:C:\sdk\tools\ContentBuilder\builder\steamcmd.)
Once logged in type: run_app_build C:\sdk\tools\ContentBuilder\scripts\app_build_0123450.vdf
This should upload exactly the same way it did when you uploaded your project for the very first time but there is one difference. STEAM compares the files with the previous files and if they have changed in size it will automatically upload those files into the depot. This also means that it does not upload the whole project again and only uploads the modified files. Now that we have done this we need to tell STEAMWORKS what to do.
- Log into STEAMWORKS.
- Under the topic "Technical Tools", click Edit Steamworks Settings.
- Under the topic "SteamPipe" click "Builds." Scroll down until you see something similar like the example image below.
- In the "example image" below you will have another build in your list. The top build is your latest build. If your not sure it displays the date anyway.
- Click the green arrow near the words: Preview Change and select "default"
- Click Preview Change and wait for any messages from STEAM. If all goes well it should have no errors.
Select the top build since this is your latest build. Select default and click Preview Change . Wait for any messages from STEAMWORKS to see if it was successful. If there are any issues ready them carefully.
Once you have published your changes, log into STEAM and it should upload your changes to your project.
Now don't forget to publish the changes or your patch won't work!
Click the Publish Tab at the top.
Click "Prepare for Publishing" to check for conflicts.
Once Steamworks has finished checking for any conflicts type in "STEAMWORKS" in the text box and click "Really Publish".
Open STEAM and check your project, it should upload your patch!
Setting up your EULA . (UDK License agreement.)
One problem I faced while setting up DASM within STEAM was the EULA. So I decided to add this tutorial just in case you have the same issue.
The below topic is found under Store Presence in your STEAMWORKS account.
So what is a EULA and where is it?
An End User License Agreement (EULA) is a legal contract between a software application author or publisher and the user of that application.
Click on "Edit Store Page" in your STEAMWORKS account to start.
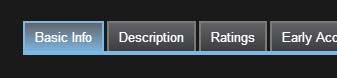
- Make sure that the topic "Basic Info" is selected. (Image left.)
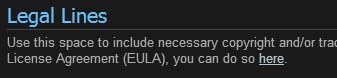
- Scroll down the page until you find the topic "Legal Lines."
- Locate the sentence that states; Use this space to include necessary copyright and/or trademark information. If you are looking for somewhere to present the customer with an End User License Agreement (EULA), you can do so here.
- Click the word "here."
Left is an example image of how you would set up your EULA.
The title should be the name of your project followed by (EULA) Choose your language also. If you have more than one language than create an EULA in each language.
But where is the EULA?
For example, we have a 2012 UDK install on C:\. Locate the folder: C:\UDK\UDK-2012-05\Binaries\InstallData
This folder contains the UDK EULA in 13 languages. Open the file in the language you want and select all of the text.
Copy and paste the text into the "EULA Contents" in the STEAMWORKS page.
Click save and repeat for other languages.
Click the "Publish" tab next to "Content"
Click "Really Publish" to save it to your "Store Page".
If you want to view your EULA on your store page, click the text within the topic 'View Store Page" that says :(View in Beta mode)
Well done, you have worked hard on your UDK project and completed it. Uploaded it to STEAM and setup all of your store page and achievements, Trading cards, Emoticons and Backgrounds. Then you decide its time to release your project. It seems to work fine on your computer and your ready to go! Or are you?
The below topic is found under Technical Tools in your STEAMWORKS account.
One big mistake with UDK products is not adding the redistributables. These will install on your PC while installing your completed UDK project. But, if you upload your project to STEAM and a client downloads it, they don't get to download the redistributables. This isn't a major problem thanks to the STEAMWORKS redistributable page!
- Log into STEAMWORKS if your not logged in already.
- Click on the topic "Edit Steamworks Settings" under the topic "Technical Tools".
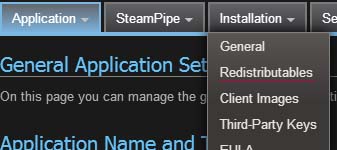
- Click on the tab "Installation"
- Click on the drop down arrow and select "Redistributables" (Example image left".)
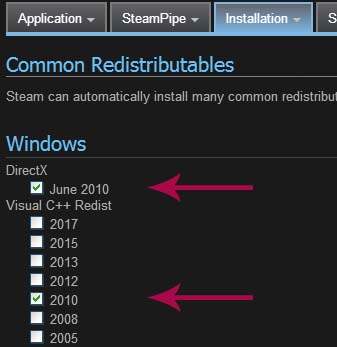
- Place a tick in the box under the topic "DirextX" in "June 2010".
- Place a tick in the box under the topic "Visual C++Redist" in 2010".
This should automatically update without having to press save or anything like that. But whenever in doubt always "Publish" your work after any changes. This is a reassurance that all changes have been saved most definitely.
We hope these tutorials helped you or even one of these tutorials helped you if you needed the knowledge. It has been a pleasure to help people that we have never met and your success is our success. We hope you do well with your project and wish you the best for a bright and wonderful future. We would even be happy to hear from you also and let us know we helped you in some way. It really makes our day knowing we helped someone in some way!!
Shane Hillier
______________________________________________________________________
All software packages created was used by the power of the Unreal Development Kit.
In game loading screens created by using BINK VIDEO. ______________________________________________________________________
[Top]


Comments on this site to: feedback@worldofdasm.com
Date Modified: 27/07/2017
© World of DASM, and the DASM series, created by Shane Hillier
.
© 2013-2017 all rights reserved