Welcome to the world of DASM! For students who want to learn!

LINKS

How to install Landscape.


Button Text

FACEBOOK

GOOGLE

Installing a downloaded landscape

If you have downloaded one of our Landscapes from HERE you may have encountered some problems. UDK isn't always about adding files and using them as soon as they are installed. Sometimes they need to be tweaked or guided to where its resources are coming from. So I created this tutorial to help guide you especially if your Landscape has no sounds. If your Landscape has no textures then you will need to RE-INSTALL UDK with the UT game and materials that come with it. Download the files below because they are in the demo tutorial but any Landscape file will really do.

 DOWNLOAD: Rockyridge.udk     DOWNLOAD:  Physical Material Sounds.upk  (Very important!)

Right Click in a blank area, then left click on "add a new folder", to the directory called "Contents", and call it "Landscape."

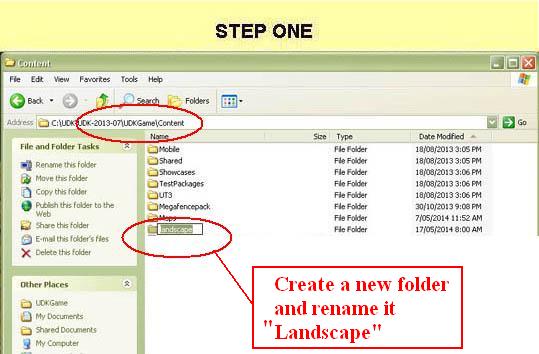
STEP ONE

Locate your UDK installation. The default directory is  C:\ UDK. Now locate the folder; C:\ UDK \ UDK-2013-07 \ UDKGame \ Content.

Within this directory create a new folder and call it "Landscape." 

If you have not got any landscape yet, click HERE to grab some and also click HERE to grab the file that directs some sounds to the maps. (Very important.)

 This will vary depending on what version of UDK you have installed. Also this is the default directory and may be different to C:\ depending on where you installed it.

Copy or paste the files you downloaded inside the folder you created called Landscape.


STEP TWO

Open the folder you created called "Landscape" and add the two files that can be downloaded on the above links or add whatever file or files you have chosen.

*PLEASE NOTE*

It is vital that you install the PhysicalMaterialssounds or you will not have any sounds on the Landscapes you download from this site. Once you work out how Physical Sounds work you will be able to assign your own sounds and see how simple this file is.

Can't see the file? Type in Greenrocky in the search bar, tick the materials checkbox and that should be all.

STEP THREE

Start the UDK editor. Normally the Content Browser opens when you start the UDK editor but if not open the Content Browser. (Button located left to the green letter "K")

You can test the files now if you wish. Look for the folder "UDKGame", then "Content" and click on the folder "Landscape." This can be located on the left hand side under the button All Assets. Don't forget to click the topic "Packages" if you cannot see anything.

Can't see it? Then try this, in the second image below left type "Greenrocky" in the search bar and click the "Materials" checkbox under the topic "Object Type." This should take you directly to the folder. If not, right click image and select, "Find Package." Delete search bar words, un-tick the materials checkbox and all the files should display.

If you have trouble finding anything try to memorize the name and look for it in the search bar. Normally if you cannot find it nor see it, then it's not installed or there is some other issue.

STEP FOUR

Let's load the map now. Click "file" in the upper left hand side. Click "open."

Locate the folder Landscape.

Open the folder Landscape and click the file, "Rockyridge."

When the map loads, to the right of the word file is edit, then view, then brush, then build. Click on the menu that says "Play."

Select the option, "On PC."

To exit map, you can press the key above tab and below escape. (The ~ key) and type in the command exit then press enter. (This is known as a Console Command.)

The other option is to right click on the map itself and select "play from here." By doing this all you will have to do is press the Esc key to exit the map.

Be aware when testing maps this way make sure where you want to start is clear of any obstructions or anything that may get in your way.

Have fun!!!!!

[Top]

______________________________________________________________________

  All software packages created was used by the power of the Unreal Development Kit.

  In game loading screens created by using BINK VIDEO.

______________________________________________________________________

Comments on this site to: feedback@worldofdasm.com

Date Modified: 04/01/2016

© World of DASM, and the DASM series, created by Shane Hillier

.

© 2013-2016 all rights reserved